 09:23
09:23

Wood carving is a form of working wood by means of a cutting tool held in the hand (this may be a power tool), resulting in a wooden figure or figurine (this may be abstract in nature) or in the sculptural ornamentation of a wooden object। The phrase may also refer to the finished product, from individual sculptures, to hand-worked mouldings composing part of a tracery।
For a complete history of wood carving, see history of wood carving.
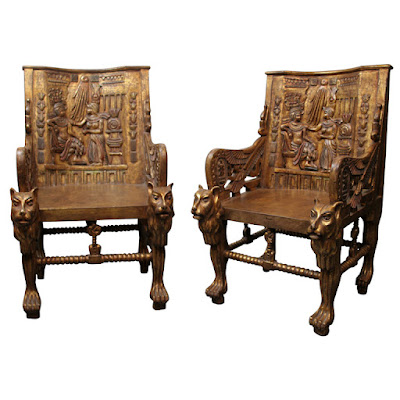
Some of the finest extant examples of early wood carving are from the Middle Ages in Italy and France, where the typical themes of that era were Christian iconography. In England many complete examples remain from the 16th and 17th century, where oak was the preferred medium in this case
Figural carving seems to have been widespread. The carving to represent one's god in a tangible form finds expression in numberless ways. The early carver, and, for that matter, the native of the present day, has found a difficulty in giving expression to the eye, and at times has evaded it by inlaying this feature with colored material.


Basic tool setthe carving knife: a specialized knife used to pare, cut, and smooth wood.
the gouge: a tool with a curved cutting edge used in a variety of forms and sizes for carving hollows, rounds and sweeping curves.
the chisel, large and small, whose straight cutting edge is used for lines and cleaning up flat surfaces.
the V-tool used for parting, and in certain classes of flat work for emphasizing lines.
the veiner: a specialized deep gouge with a U shaped cutting edge.
sharpening equipment, such as various stones and a strop, necessary for maintaining edges.
A special screw for fixing work to the workbench, and a mallet, complete the carvers kit, though other tools, both specialized and adapted, are often used, such as a router for bringing grounds to a uniform level, bent gouges and bent chisels for cutting hollows too deep for the ordinary tool.
Tool terminology
Gouge – Carving tool with a curved cutting edge. The most used category of carving tools.
Sweep – The curvature of the cutting edge of a carving gouge. A lower number (like #3) indicates a shallow, flat sweep while a high number (like #9) is used for a deeply curved gouge.
Veiner – A small deep gouge with a U shaped cutting edge. Usually #11 sweep.
Fluter – A larger #11 sweep gouge with a U shaped cutting edge.
Sloyd knife – A whittling knife having a strong, fixed blade slightly shorter than the handle (around 5 inches), suitable for marking or carving.
Chisel – A carving tool with a straight cutting edge (usually termed #1 sweep) at right angles (or square to) the sides of the blade.
Skew Chisel – A chisel with the edge at a "skew" or angle relative the sides of the blade. Often termed #2 sweep in the Sheffield list or #1s in continental lists.
V-Tool or Parting Tool – A carving tool with a V shaped cutting edge. Used for outlining and decorative cuts. Refered to as 'the carvers pencil' by old time professional carvers.
Long Bent – A gouge, chisel or V tool where the blade is curved along its entire length. Handy for deep work.
Short Bent or Spoon – A gouge, chisel or V tool where the blade is straight with a curve at the end, like a spoon. Use for work in deep or inaccessible areas.
Fishtail – A gouge or chisel with a straight, narrow shank that flares out at the end to form a "fishtail" shaped tool. The narrow shaft of the tool allows for clearance in tight areas.
Back Bent – A spoon gouge with a reverse bent end. Used for undercuts and reeding work.
Palm Tools — Short (5"), stubby tools used with one hand while the work is held in the other. Great for detail and small carving.
Full-size Tools — 10" to 11" tools used with two hands or a mallet.
Tang — The tapered part of the blade that is driven into the handle.
Bolster – A flared section of the blade near the tang that keeps the blade from being driven further into the handle.
Ferrule – A metal collar on the handle that keeps the wood from splitting when the tool is used with a mallet. Some tools have an external, visible ferrule while others have an internal ferrule.Some old, small detail tools have neither bolster nor ferrule as their light use makes them unnecessary.
Rockwell Hardness – A scale that indicates the hardness of steel. A Rockwell range of 58 to 61 is considered optimum for fine woodworking edge tools.
Selecting a wood
The nature of the wood being carved limits the scope of the carver in that wood is not equally strong in all directions: it is an anisotropic material. The direction in which wood is strongest is called "grain" (grain may be straight, interlocked, wavy or fiddleback, &c.). It is wise to arrange the more delicate parts of a design along the grain instead of across it, and the more slender stalks or leaf-points should not be too much separated from their adjacent surroundings. The failure to appreciate these primary rules may constantly be seen in damaged work, when it will be noticed that, whereas tendrils, tips of birds beaks, &c., arranged across the grain have been broken away, similar details designed more in harmony with the growth of the wood and not too deeply undercut remain intact. Probably the two most common woods used for carving are Basswood(aka Tilia or Lime) and Tupelo, both are hardwoods that are relatively easy to work with. Chestnut, American walnut, mahogany and teak are also very good woods; while for fine work Italian walnut, sycamore maple, apple, pear or plum, are generally chosen. Decoration that is to be painted and of not too delicate a nature is as a rule carved in pine.
Carving
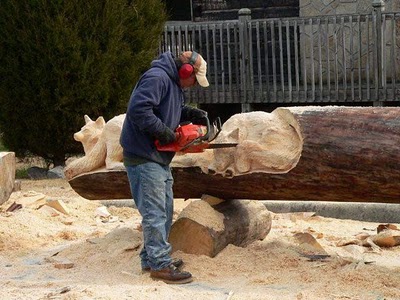
A wood carver begins a new carving by selecting a chunk of wood the approximate size and shape of the figure he or she wishes to create or, if the carving is to be large, several pieces of wood may be laminated together to create the required size. The type of wood is important. Hardwoods are more difficult to shape but have greater luster and longevity. Softer woods may be easier to carve, but are less resistant to damage. Any wood can be carved but they all have different qualities and characteristics. The choice will depend on the requirements of carving being done: for example a detailed figure would need a wood with a fine grain and very little figure.Once the sculptor has selected their wood, he or she begins a general shaping process using gouges of various sizes. The gouge is a curved blade that can remove large portions of wood smoothly. For harder woods, the sculptor may use a chisel and mallet, similar to a stone carver. Smaller sculptures may require the wood carver to use a knife, and larger pieces might require the use of a saw. No matter what wood is selected or tool used, the wood sculptor must always carve either across or with the grain of the wood, never against the grain.
Once the general shape is made, the carver may use a variety of tools for creating details. For example, a “veiner” or 'fluter' can be used to make deep gouges into the surface, or a “v-tool” for making fine lines or decorative cuts. Once the finer details have been added, the wood carver finishes the surface. The method chosen depends on the required quality of surface finish. The texture left by shallow gouges gives 'life' to the carving's surface and many carvers prefere this 'tooled' finish. If a completely smooth surface is required general smoothing can be done with tools such as “rasps,” which are flat-bladed tools with a surface of pointed teeth. “Rifflers” are similar to rasps, but smaller, usually double ended, and of various shapes for working in folds or crevasses. The finer polishing is done with abrasive paper. Large grained paper with a rougher surface is used first, with the sculptor then using finer grained paper that can make the surface of the sculpture slick to the touch.
After the carving and finishing is completed, the artist may seal & color the wood with a variety of natural oils, such as walnut or linseed oil which protects the wood from dirt and moisture. Oil also imparts a sheen to the wood which, by reflecting light, helps the observer 'read' the form. Carvers seldom use gloss varnish as it creates too shiny a surface, which reflects so much light it can confuse the form; carvers refer to this as 'the toffee apple effect'. Objects made of wood are frequently finished with a layer of wax, which protects the wood and gives a soft lusterous sheen. A wax finish is comparatively fragile though and only suitable for indoor carvings.


The American Woodcarving School was founded in 1974 by Sculptor Michael Denike. Mr. Denike’s dream…a school that’s sole purpose is instructing and promoting the art of Woodcarving. The school holds regular day and evening classes 52 weeks out of the year, and approximately 6 weekend workshops per year.
The regular classes allow the student to work on whatever area they wish while under direction of a professional woodcarver. Weekend Workshops hosted by renowned woodcarvers from the US, Canada, and Europe, allow the more advanced student the chance to train under an artist of the highest level in his or her area of interest
Read More
The regular classes allow the student to work on whatever area they wish while under direction of a professional woodcarver. Weekend Workshops hosted by renowned woodcarvers from the US, Canada, and Europe, allow the more advanced student the chance to train under an artist of the highest level in his or her area of interest
For our first installment I’m going to talk about some basic things you’ll want to have handy to get started woodcarving. Some of these are things you already know and some of them you may not have thought of but I have found them all to be very handy.
Wood
I bet you already had this one figured out. If you didn’t know you needed wood to be a woodcarver you may need to find a friend to help you along.
What kind of wood? That’s a great question. Most folks start out with basswood. It’s tight-grained but it’s not too hard. It also paints well. Another wood similar to basswood is jelutong. If you want a wood with a nice grain for a natural finish then pick butternut. If you plan on doing a lot of power carving then tupelo is nice for that.
Carving tools
This one’s pretty obvious as well. Occasionally you’ll find some Neanderthal beating on a piece of wood with a rock but for good results you definitely need some tools specifically for carving.
Which tools do you need first? First of all I would buy a knife. There are some very specific knives out there for woodcarving. There are knives for roughing out, detailing, and other functions. I would start with a general purpose knife and add some others as you go along. I do not recommend a regular pocket knife. That’s fine for whittling but won’t do much for your carving.
Adding gouges is next. I started with a nice v-tool and then worked my way into the rounded gouges. There are enough options out there to fill the hands of an octopus. Don’t add tools until you know you need one.
If you are like the rest of us, as soon as you buy your first tool you will contract a horrible condition called collectus muchos toolitis. The basic symptom is the constant desire to add tools to your collection. The only known cure is to hide money in your mattress and use it to buy more tools. If your spouse finds out you may contract a condition called gluteous muchos hurtous.
Which tools to buy? There are many brands of tools on the market and many of them are of fine quality. Check out the advertisements in ‘Carving Magazine’ for the different brands and vendors. Visit the vendor websites or give them a call if you have specific questions about their tools. Always buy quality tools. They’ll last a lifetime and you’ll never regret it.
Sharpening
Have you ever tried to cut through a piece of leather with a butter knife? You end up frustrated with a mess of hide and the cow ain’t happy either. That’s exactly what it’s like trying to carve with dull tools. Wood is hard. Even the best wood in the world won’t carve well with dull tools.
Most tools you buy will come pre-sharpened (always check with your vendor). You won’t have to put an edge on them but you will need to maintain that edge so first off buy a strop. A strop is basically a piece of leather that you can add some compound to that will help keep your already sharp edge sharp. Think straight-razor-old-timey-barber-shop and you know what a strop is.
For more advanced sharpening there are many different stones and machines out there. Again, check the advertisements in the magazine and past articles for more details on this subject.
Vices and other holding methods
You’ve got wood and some sharp tools so you’re almost ready to go. The next thing you’ll need is some way to hold the wood.
For smaller pieces I usually just use my hand. Hands are very good at holding wood, they’re small, portable, and I usually always have two of them with me. You can’t ask for more! The problem with hands is that they are very susceptible to being cut. There was once a great baseball pitcher named Three-Fingers Brown. That was a neat baseball name. However, Two-Fingers Smith isn’t as exciting if you got that name from your carving buddies. Wear a protective carving glove on the hand that holds the wood. There are many different kinds available and I guarantee that you can find one you like. I also wear a protective piece on the thumb on my hand that holds the knife. This protects my thumb when I’m pulling the knife towards it. If I slip I’m usually OK.
If you’re carving larger items you will want to invest in a vise. There are many of these around. They come in a variety of sizes and have different abilities to position the wood in favorable ways. Do your research and you’ll be alright.
Something to Carve
This can be the biggest problem for some novices. They can’t figure out what to carve. I went through a long period of trying to carve what others were carving, carving what I thought others would like, or trying to carve what would sell. None of those options are any fun. There’s only one thing you should carve and that’s what you like. If you like birds then carve birds, fish then fish, caricatures then caricatures. You get the idea. If you already like it then you’ll probably know it pretty well and be more interested in doing a good job. Look through this issue and past issues for ideas
Read More
Wood
I bet you already had this one figured out. If you didn’t know you needed wood to be a woodcarver you may need to find a friend to help you along.
What kind of wood? That’s a great question. Most folks start out with basswood. It’s tight-grained but it’s not too hard. It also paints well. Another wood similar to basswood is jelutong. If you want a wood with a nice grain for a natural finish then pick butternut. If you plan on doing a lot of power carving then tupelo is nice for that.
Carving tools
This one’s pretty obvious as well. Occasionally you’ll find some Neanderthal beating on a piece of wood with a rock but for good results you definitely need some tools specifically for carving.
Which tools do you need first? First of all I would buy a knife. There are some very specific knives out there for woodcarving. There are knives for roughing out, detailing, and other functions. I would start with a general purpose knife and add some others as you go along. I do not recommend a regular pocket knife. That’s fine for whittling but won’t do much for your carving.
Adding gouges is next. I started with a nice v-tool and then worked my way into the rounded gouges. There are enough options out there to fill the hands of an octopus. Don’t add tools until you know you need one.
If you are like the rest of us, as soon as you buy your first tool you will contract a horrible condition called collectus muchos toolitis. The basic symptom is the constant desire to add tools to your collection. The only known cure is to hide money in your mattress and use it to buy more tools. If your spouse finds out you may contract a condition called gluteous muchos hurtous.
Which tools to buy? There are many brands of tools on the market and many of them are of fine quality. Check out the advertisements in ‘Carving Magazine’ for the different brands and vendors. Visit the vendor websites or give them a call if you have specific questions about their tools. Always buy quality tools. They’ll last a lifetime and you’ll never regret it.
Sharpening
Have you ever tried to cut through a piece of leather with a butter knife? You end up frustrated with a mess of hide and the cow ain’t happy either. That’s exactly what it’s like trying to carve with dull tools. Wood is hard. Even the best wood in the world won’t carve well with dull tools.
Most tools you buy will come pre-sharpened (always check with your vendor). You won’t have to put an edge on them but you will need to maintain that edge so first off buy a strop. A strop is basically a piece of leather that you can add some compound to that will help keep your already sharp edge sharp. Think straight-razor-old-timey-barber-shop and you know what a strop is.
For more advanced sharpening there are many different stones and machines out there. Again, check the advertisements in the magazine and past articles for more details on this subject.
Vices and other holding methods
You’ve got wood and some sharp tools so you’re almost ready to go. The next thing you’ll need is some way to hold the wood.
For smaller pieces I usually just use my hand. Hands are very good at holding wood, they’re small, portable, and I usually always have two of them with me. You can’t ask for more! The problem with hands is that they are very susceptible to being cut. There was once a great baseball pitcher named Three-Fingers Brown. That was a neat baseball name. However, Two-Fingers Smith isn’t as exciting if you got that name from your carving buddies. Wear a protective carving glove on the hand that holds the wood. There are many different kinds available and I guarantee that you can find one you like. I also wear a protective piece on the thumb on my hand that holds the knife. This protects my thumb when I’m pulling the knife towards it. If I slip I’m usually OK.
If you’re carving larger items you will want to invest in a vise. There are many of these around. They come in a variety of sizes and have different abilities to position the wood in favorable ways. Do your research and you’ll be alright.
Something to Carve
This can be the biggest problem for some novices. They can’t figure out what to carve. I went through a long period of trying to carve what others were carving, carving what I thought others would like, or trying to carve what would sell. None of those options are any fun. There’s only one thing you should carve and that’s what you like. If you like birds then carve birds, fish then fish, caricatures then caricatures. You get the idea. If you already like it then you’ll probably know it pretty well and be more interested in doing a good job. Look through this issue and past issues for ideas


<object width="640" height="385"><param name="movie" value="http://www.youtube.com/v/r36cBGFnfqc&color1=0x5d1719&color2=0xcd311b&hl=en_US&feature=player_embedded&fs=1"></param><param name="allowFullScreen" value="true"></param><param name="allowScriptAccess" value="always"></param><embed src="http://www.youtube.com/v/r36cBGFnfqc&color1=0x5d1719&color2=0xcd311b&hl=en_US&feature=player_embedded&fs=1" type="application/x-shockwave-flash" allowfullscreen="true" allowScriptAccess="always" width="640" height="385"></embed></object>
Read More
<object width="640" height="385"><param name="movie" value="http://www.youtube.com/v/TFMuQrQi7P4&color1=0x5d1719&color2=0xcd311b&hl=en_US&feature=player_embedded&fs=1"></param><param name="allowFullScreen" value="true"></param><param name="allowScriptAccess" value="always"></param><embed src="http://www.youtube.com/v/TFMuQrQi7P4&color1=0x5d1719&color2=0xcd311b&hl=en_US&feature=player_embedded&fs=1" type="application/x-shockwave-flash" allowfullscreen="true" allowScriptAccess="always" width="640" height="385"></embed></object>
Read More
<object width="640" height="385"><param name="movie" value="http://www.youtube.com/v/Hc9sHMKNRHg&color1=0x5d1719&color2=0xcd311b&hl=en_US&feature=player_embedded&fs=1"></param><param name="allowFullScreen" value="true"></param><param name="allowScriptAccess" value="always"></param><embed src="http://www.youtube.com/v/Hc9sHMKNRHg&color1=0x5d1719&color2=0xcd311b&hl=en_US&feature=player_embedded&fs=1" type="application/x-shockwave-flash" allowfullscreen="true" allowScriptAccess="always" width="640" height="385"></embed></object>
Read More
<object width="640" height="385"><param name="movie" value="http://www.youtube.com/v/Gy0KIzo4KB0&color1=0x5d1719&color2=0xcd311b&hl=en_US&feature=player_embedded&fs=1"></param><param name="allowFullScreen" value="true"></param><param name="allowScriptAccess" value="always"></param><embed src="http://www.youtube.com/v/Gy0KIzo4KB0&color1=0x5d1719&color2=0xcd311b&hl=en_US&feature=player_embedded&fs=1" type="application/x-shockwave-flash" allowfullscreen="true" allowScriptAccess="always" width="640" height="385"></embed></object>
Read More


Subscribe to:
Comments (Atom)